Category Archives: Dessert

Recipe Recap

I haven’t posted here on my own blog in awhile because I’ve been busy sharing recipes over at Kids VT! Here are a few of my latest yummy creations….check out the Kids VT Blog for more!

Cinnamon Roll Cupcakes


 Homemade Shells & Cheese

Buffalo Chicken Soup

Smothered Burritos

Recipe: Pumpkin Trifle

I shared a delicious fall recipe over at Burlington VT Moms Blog today!

Check it out: Pumpkin Trifle

I also took the same idea and made into a bigger batch for a crowd. I basically tripled the recipe and loaded it up in a baking dish. It would be beautiful in a trifle dish but, GASP-SHAME, I don’t own one.

Enjoy!

Recipe: Chocolate Peanut Butter Cake

Chocolate cake frosted with peanut butter frosting and homemade peanut clusters.

I KNOW!

Chocolate Peanut Butter Cake with Homemade Peanut Clusters

Ingredients:

1 package chocolate cake mix
1 cup cold milk
1 package chocolate instant pudding mix (4 serving size)
1/2 cup peanut butter
1/2 cup peanuts
2 squares semi-sweet baking chocolate
1 container whipped topping

Preheat oven to 350 degrees. Prepare and bake cake according to package. Use two 9 inch round cake pans. Cool a few minutes and then remove from pans. Let cool completely.

Mix together milk and pudding mix. Beat until well blended. Add peanut butter and mix well.

Trim cake tops if needed to make them flat. Place one of the cake layers on a serving platter. Spread one cup of the peanut butter mixture over the top. Place second cake layer on top. Stir whipped topping into remaining peanut butter mixture. Spread over top and sides of cake.

Melt the chocolate squares. Mix with peanuts. Drop by spoonfuls onto a waxed paper covered tray. Refrigerate until firm. Place on top of cake before serving.

This cake is so delicious you won’t believe your mouth!

Enjoy!

Recipe: Chocolate Toffee Cupcakes

I found a recipe for Toffee Crunch Cupcakes on Pinterest and I was just dying for a chance to try them.

A couple of weeks ago I had the chance to make them for a lunch with friends but while living in a hotel baking is a bit problematic. For instance, I had one bowl and a whisk. So the recipe from the link above was just not happening. I didn’t give up though. When it comes to chocolate stuff covered in toffee, I’m no quitter.

I made a very cheap version based off the delicious idea Bakers Royale had. For the much more delicious luxurious version, check out her recipe!

Here’s how I made my not-homemade-at-all version:

Ingredients:
Chocolate cake mix and ingredients according to box
Can of cream cheese frosting
Jar of caramel sauce
Semi-sweet chocolate chips
Butter
Toffee chips

Cupcake: Bake chocolate cupcakes from a box, following box directions. Cool completely.

Frosting: Add about half a cup of caramel sauce ice cream topping to a can of cream cheese frosting. *The sauce makes the frosting a bit soft but refrigerating for a little bit helps harden it.

Chocolate Topping: Melt 2/3 cup semi-sweet chocolate chips and 3 tablespoons of butter together. (I can’t remember, but I might have doubled this)

Assembly: Stick cupcakes in the freezer for about 20 minutes. This makes it easier to dip them into the chocolate. Dip cupcakes into the bowl of chocolate, swirling to coat the top. Dip into the toffee bits. Let harden. Pipe caramel frosting on top. I kept them refrigerated until serving to keep the frosting and chocolate hard.

Enjoy!

This Post Linked To Sweet Tooth Friday!

Recipe: Blackberry Cobbler

This recipe is based off of The Pioneer Woman’s Blackberry Cobbler recipe. I wanted a bigger serving than hers but doubling it wasn’t quite right so here is what I used to make a 9×13 pan sized dish.

Ingredients:
1 1/2 sticks of butter
1 1/2 cups of sugar plus a little extra for sprinkling on top
2 cups self rising flour (Recipe to make your own Homemade Self Rising Flour)
2 cups milk
5 cups blackberries, rinsed and pat dry (frozen or fresh)
Extra 1/4 cup sugar for sprinkling on top

Melt butter. Mix together the flour and sugar. Whisk in the milk. Pour melted butter in and whisk all together until mixed well. Grease a 9×13 pan. Pour into pan. Sprinkle blackberries over the top of the batter evenly. Sprinkle with additional 1/4 cup sugar if preferred.

Bake at 350 degrees for a little over an hour or until bubbly and cooked through in the middle.

Serve warm with ice cream or whip cream. Who are we kidding, serve with both.

Enjoy!

No Bake Nutella Cheesecake

nutellacheesecake1

I found this recipe from one of my favorite food blogs Let’s Dish. She notes that the original recipe is from My Baking Addiction. (Who I just became a follower of because, WOW!)

Whoever you get the recipe from, just MAKE IT! Because this was delicious and so easy to make!

I made the cheesecakes in mini jelly jars which made is perfect to pack and bring for lunch with friends!

This recipe is very much spoon licking worthy. So be sure to have helpers around! Or not.

lickthespoon

Recipe: Easy Three Ingredient Peanut Butter Cookies

There is nothing better than the classic peanut butter cookie and a glass of milk. Here is a recipe using three ingredients that will make you very happy!

1 cup sugar
1 cup peanut butter
1 egg

Mix together. Plop on a cookie sheet. Bake at 350 degrees for about 12 minutes.

Seriously, it’s that easy.

I use a cookie dough scoop to make mine nice and round. But you could just use whatever spoon you have! I then use the crisscross fork trick to flatten them down. If you are making them into the ever popular peanut butter blossom cookie, just leave them as a round ball and after baking, squish a Hershey’s kiss on top. This recipe also works perfect in a cookie press!

My biggest cookie making tip is not to over cook them! Take them out just before they are done and let sit on the cookie sheet for a minute before transferring to a cooling rack. This lets the sugars crystallize and the cookie will harden but still stay soft inside!

Enjoy!

Linked to:

 Photobucket

Recipe: Caramel Carrot Cake

A last minute dinner with friends left me looking for a quick and easy dessert last week. I happened to have a couple of cake mixes on hand thanks to a recent sale so that was my easy fix. I had a carrot cake mix and a can of cream cheese frosting. I know, I know, a cake mix AND canned frosting. It’s like I don’t even know the name of my own blog.

Anyway, looking for a way to spruce the plain cake mix up, I found this recipe from Betty Crocker for Caramel Carrot Cake. I was pleasantly surprised how nicely it turned out considering it wasn’t homemade! I did things just a teeny bit differently than they did…

Caramel Carrot Cake

Ingredients:

1 box carrot cake mix
1 cup water
1/2 cup butter, melted
3 eggs
1 jar caramel topping
1 container cream cheese frosting
 
Heat oven to 350 degrees. Grease or spray pan. (The BC recipe has you make it as a 9×13 cake, I made mine in two circle cake pans so I could stack them all pretty-like.) 
 
Mix together the cake mix, water, butter and eggs. Pour into pan(s).
Bake for about 30 minutes or until a toothpick comes out clean.
Cool. The BC recipe has quite a few steps listed at this point. I just poked a few holes in the cakes, covered each layer in caramel, stacked them on top of each other and covered in frosting. Easy! I think next time I will put some frosting in between the middle layer as well.
 

This is just luscious with a hot cup of coffee!


 Enjoy!
 
Linked to:


Photobucket

Texas Roadhouse Cinnamon Sugar Butter and Rolls Copycat Recipe

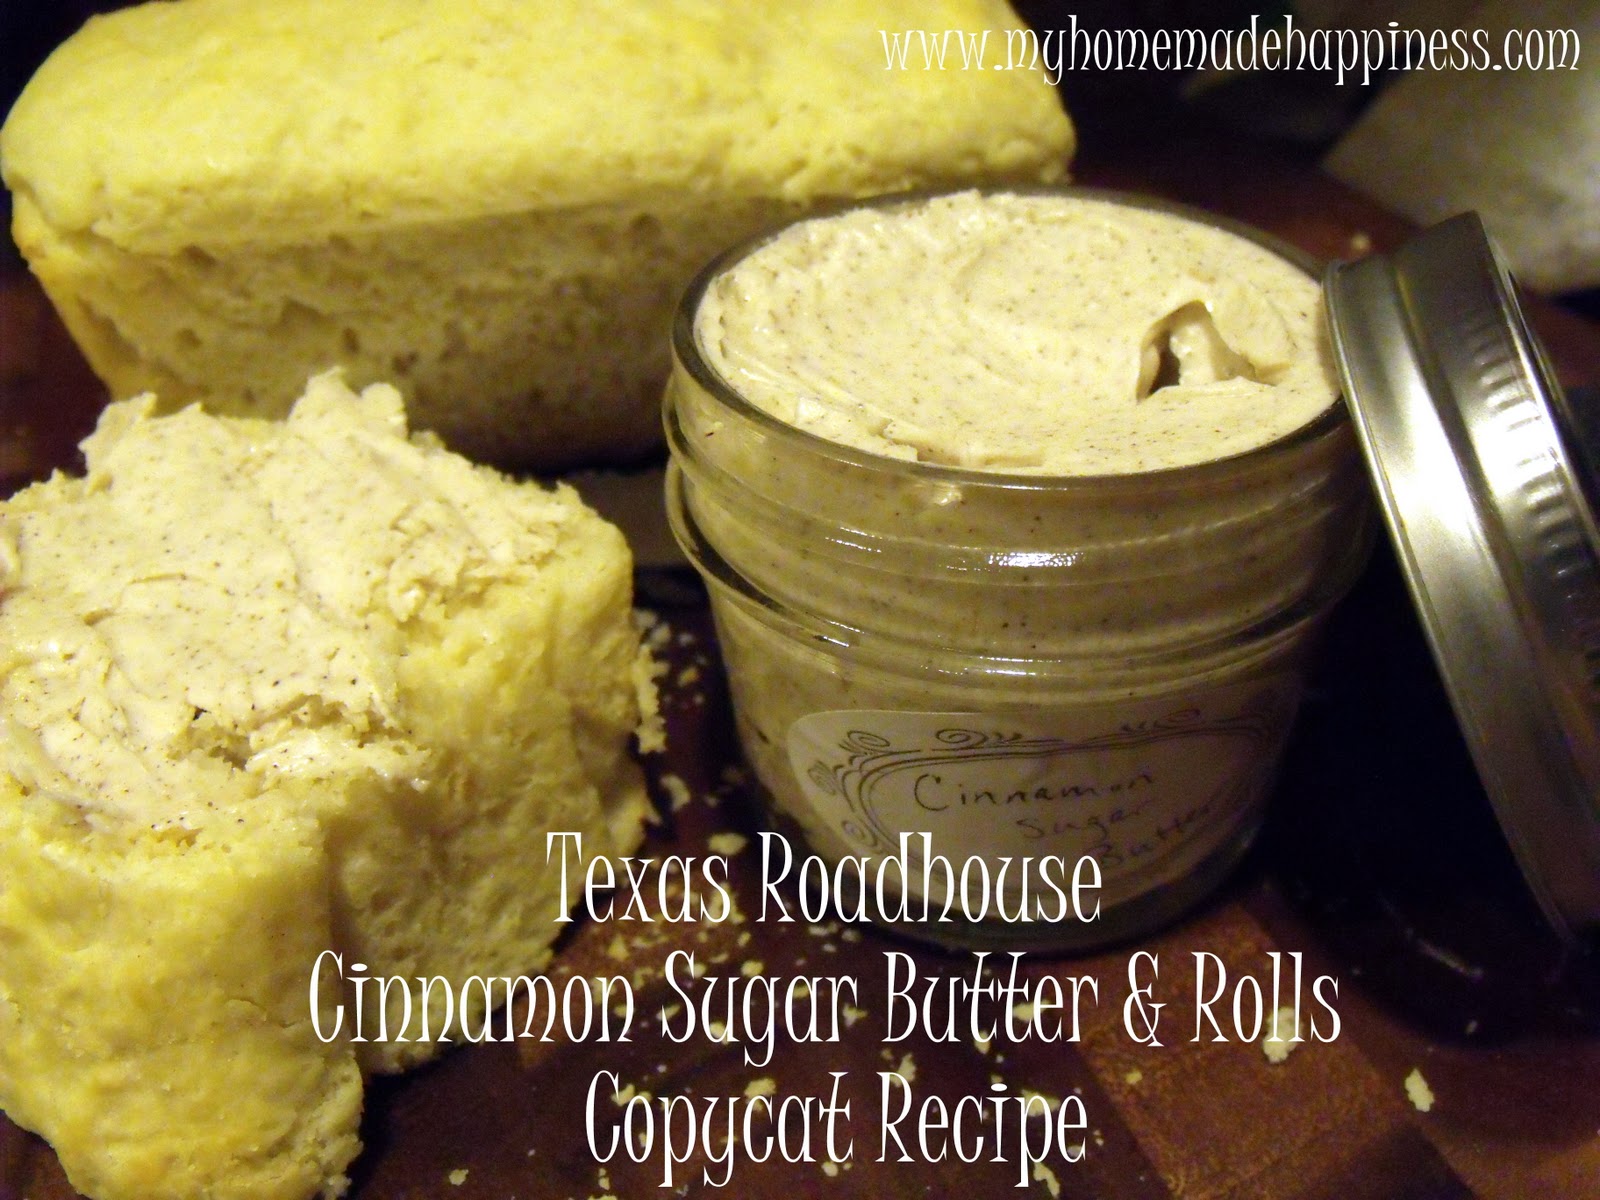
I could go to Texas Roadhouse and just eat their rolls with their cinnamon sugar butter. Well…maybe I have. But I mean, come one! That BUTTAH is heaven! YUM!

There is no need to embarrass yourself at a public restaurant any longer. Here is a copy cat version that is equally to die for! And if you eat the whole thing in one sitting for dinner, no one will judge you. Except for maybe your husband. But he doesn’t count.

Cinnamon Sugar Butter

Ingredients:
2 sticks of butter – softened, not melted!
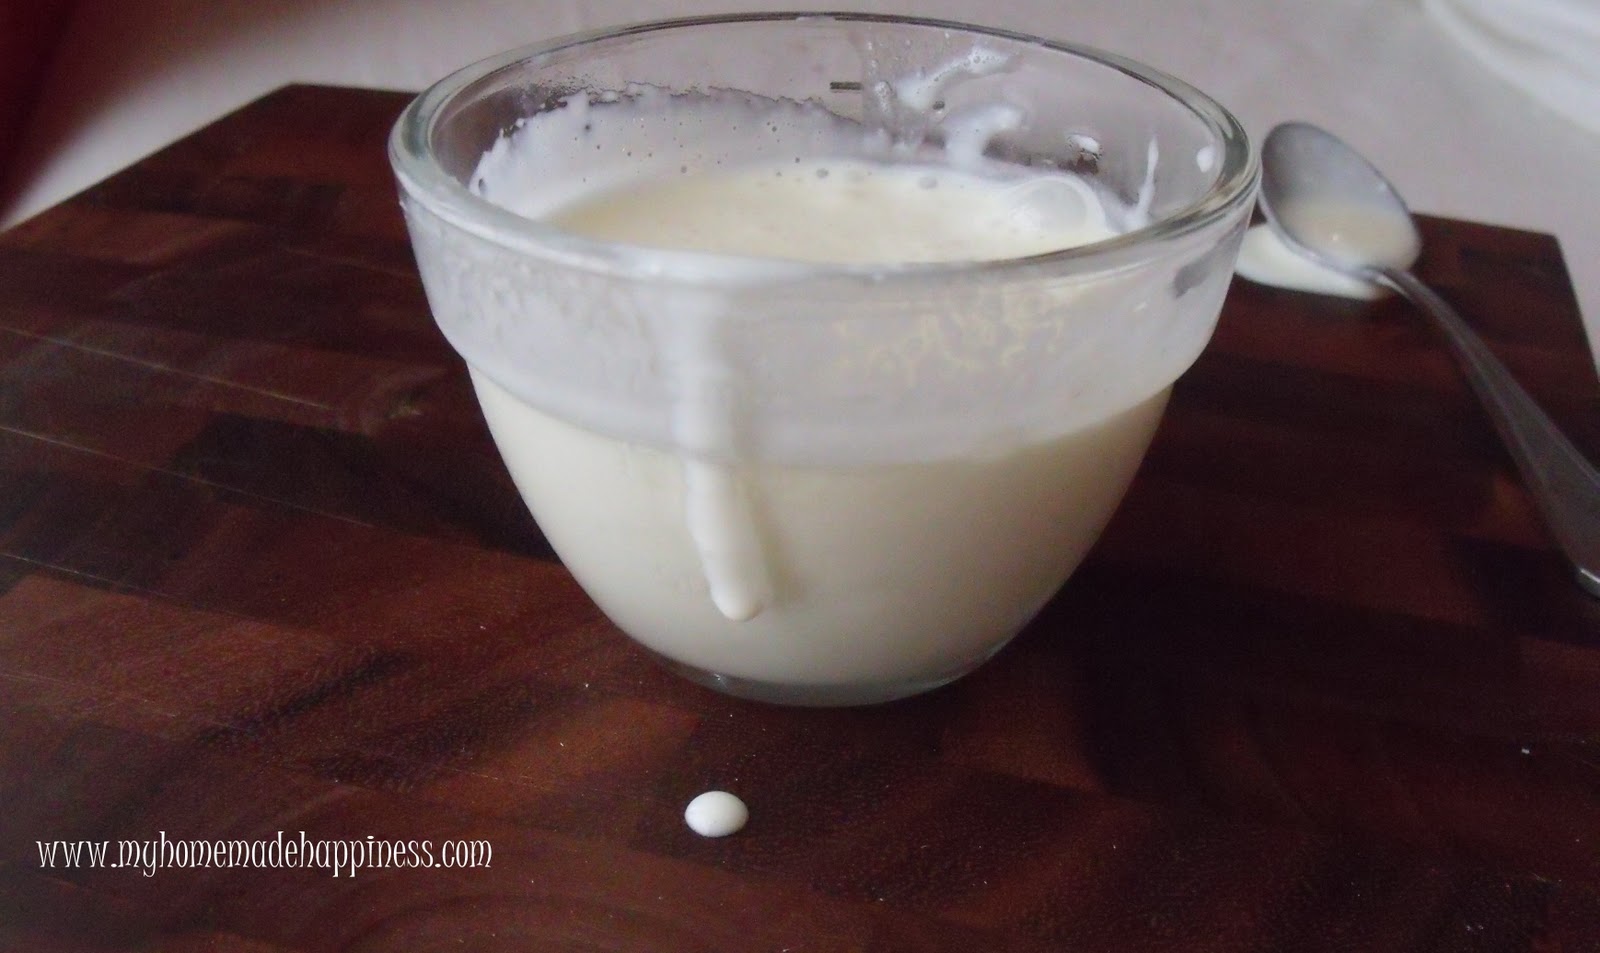
1/3 cup sweetened condensed milk – chilled (link leads to a easy homemade version!)
1/2 tsp light corn syrup
1 tsp cinnamon

(So…this isn’t one of those healthy type recipes. You’re getting that, right?)

Place all ingredients in a food processor and blend until mixture is smooth.

We have left it out on the counter for a good two weeks and it was still perfectly good. Stored in the refrigerator it will last even longer, but it does get hard and will need to soften before served.

Rolls (or Bread)

3 cups all-purpose flour
2 (1/4 ounce) packages active dry yeast
1 teaspoon salt
2 tablespoons sugar
1/4 cup nonfat dry milk
1 1/4 cups warm water (105 to 115 degrees F)
1 large egg slightly beaten
8 tablespoons butter melted
2 tablespoons shortening

Place 2 cups flour in a large mixing bowl. Add yeast, salt, sugar and dry milk. Set aside. In a mixing bowl, combine water and egg and stir to blend. Make a well in the center of the dry ingredients. Pour water mixture into the well. Mix by hand, beating 150 strokes and frequently scraping bottom and sides of bowl. Add half of the melted butter and beat to incorporate. Add remaining flour, a little bit at a time, beating to incorporate each addition. Cover bowl with plastic wrap. Set dough in a warm, draft free place.

Allow batter to rise until doubled, about 1 hour. Coat cups, bottoms and sides of 12 cup muffin pan (or two small round pans) with shortening. Punch down batter (batter will be extremely soft and sticky). Drop by hand or spoonful into prepared muffin cups to make 12 rolls (or in pan touching the next). Brush dough with 1/2 remaining melted butter. Let rise uncovered in a warm draft free place until doubled, about 30 minutes. In preheated 400 degree oven, bake rolls on middle rack for 16-18 minutes. Brush tops of baked rolls with remaining melted butter.

This time I baked the dough in mini bread pans and then wrapped them with a little jar of the butter for gifts. And then I…I mean…we ate the rest in 2 seconds flat.

*I did not create this recipe, I have had it for years and honestly do not know where I found it. There seem to be quite a few versions when googled, this is the only one I’ve tried. It’s so delicious I have no need to try others! Thank you to whoever created it. I am eternally indebted to you.

Linked to:


Photobucket

Recipe: Homemade Sweetened Condensed Milk

Sweetened condensed milk is one of those products that you think maybe you have somewhere in the pantry and you go to make something that requires it only to find out that you have evaporated milk (NOT the same thing) or it’s expired or you have none at all! Shew!

This happened to me last week as I made a copycat version of Texas Roadhouse’s cinnamon sugar butter (oh yes, recipe to come soon!) and so I hit The Google to find a substitute or homemade version of some kind. There were a few out there and one of them was a total fail. I finally found this one from good ol’ E-How and it was perfect! Pretty easy and it made about what you would get from a store-bought can!

Homemade Sweetened Condensed Milk

Ingredients:
1 cup powdered milk
1/3 cup boiling water (or more depending on the thickness you want)
2/3 cups sugar
3 tablespoons softened butter

Mix all ingredients together in a blender. Blend on high until the sugar fully dissolves and is smooth. Their version was a little too thick so I did add a little more water.

I used half of it right away and put the rest in the refrigerator. A week later it is still usable but it did get thick so I think you could re-blend it with a bit more of boiling water and it would be perfectly fine!

Linked to:


Photobucket